It’s the final morning of the trip, and I wake to a breathtaking sunrise over the mainland coast. The sky is painted with soft purples and warm oranges as the sun slowly lifts above the mountains. Below, the ocean remains calm, reflecting the silhouette of our boat on its glassy surface. This quiet moment is one of my favourites on any liveaboard, and I sit on the sundeck with a coffee in hand, taking in the stillness before our final morning of diving.
Our last dive site of the trip is also one of my personal favourites: roughly 500 metres offshore from the mainland coast lies Boonsung Wreck. It rests quietly on the sandy seabed, steeped in history and marine life waiting to be discovered.
The History of Boonsung Wreck
Boonsung Wreck was once part of Thailand’s thriving tin mining industry, dominating much of the Andaman coastline during the mid-20th century. Rather than a traditional ship, it functioned as a tin dredging vessel.
It was designed to extract sediment from the seabed and process it onboard. Operating close to shore, the dredger worked continuously sifting sand and sediment in search of valuable tin deposits. When the tin industry declined, mining operations ceased. The structure was eventually abandoned and left to sink in the mid 1980’s. Over time, the wreck settled onto the seabed at a maximum depth of around 18 metres, with its shallowest sections being approximately 14 metres deep.

The wreck’s true transformation came years later. In 2004, the Indian Ocean tsunami struck the region with devastating force. The structure was violently broken apart, with much of the original framework collapsing and scattering across the sand.
What remains today is no longer a single cohesive wreck. Instead, Boonsung is spread across five main debris sections. Twisted beams, collapsed rooms, and tangled metal cover the site, with sharp edges exposed throughout. Some areas still hint at the wreck’s original form. Other sections have been flattened entirely. The wreck rests on a sandy bottom, where silt easily lifts with movement, and penetration is not recommended due to unstable structures. Together, these broken sections now provide shelter and structure for marine life.
Descending onto Boonsung Wreck
Typically, one buoy line is fixed to the north-east side, while a second sits on the southern side of the site. However, their presence is never guaranteed. Boonsung Wreck lies outside any national park boundaries, leaving it unprotected from local fishing activity. As a result, mooring lines often break, disappear, or need replacing. Fishing gear can also be found throughout the site. These factors create additional hazards, which we keep firmly in mind as we plan and execute our two dives here.
We enter the water beside the north-east mooring line and begin our descent. Visibility here is very different from the Similan Islands, and conditions can change dramatically from day to day. On a good day, visibility reaches around 10 metres, but it can drop to just 3 metres when conditions are poor.
The wreck’s proximity to shore, combined with its fine silty bottom, makes it especially vulnerable to disturbance. Waves, swell, currents, and nearby boat traffic can all stir up sediment. Divers should also be wary of their trim and finning techniques to avoid stirring up the fine sediments.
Haloclines and Visibility at Boonsung
Haloclines are common at Boonsung Wreck and play a major role in visibility changes. They form when freshwater mixes with saltwater, creating layers of different density that bend light and distort vision. Sometimes these haloclines sit near the surface, reducing visibility immediately after entry. At other times, they blanket the wreck itself.
However, haloclines are only part of the story here. Boonsung sits on a very fine, silty seabed, which is easily disturbed by swell, currents, and surge. Because the wreck is broken into collapsed sections, sediment often becomes trapped within the metal structure. As water moves through the wreck, this silt is released and hangs in the water.
At the same time, the site lies close to the mainland and receives nutrient-rich runoff. This encourages plankton blooms, which can form dense layers throughout the water column. These plankton layers absorb light and reduce visibility suddenly. It can feel like descending into a cloud, even when the surface looks clear. Often, these effects combine. Haloclines, suspended silt, and plankton can stack together, causing the wreck to fade in and out of view while descending.
Because of this, the mooring line becomes essential. It provides both a visual and physical reference, helping us descend accurately without missing the wreck and ending up lost in the expansive sandy seabed. Following the line through the haze of silt and plankton in the shallows, I descend slowly. Gradually, a dark silhouette begins to emerge below, growing clearer as the distance closes and the visibility opens up.
Beginning to Explore
The line is attached to a metal cross that once extended into a conveyor belt system. After the tsunami, however, everything was torn apart. What now lies beneath us is a chaotic spread of metal, collapsed rooms, and broken machinery. Some sections remain recognisable, while others have fallen in on themselves. This creates a site full of holes and crevices teeming with life.
Boonsung Wreck can be explored in several different ways, depending on conditions and group experience. Guides may choose to keep the wreck to the left or right shoulder, following different routes. Because the bottom is relatively flat and the depth remains consistent, it’s important to stay aware of no-decompression limits, as time can pass quickly and divers may unknowingly drift into decompression.

To my left stands one of the few sections that remains mostly intact. A large metal structure rises from the sand, its surface covered in barnacles and scattered debris. Swimming over the top at around 14 metres, I spot an old truck tyre completely covered in sea urchins. It’s here that the potential dangers of the wreck become immediately clear. Sharp edges, unstable metal, and hidden fishing gear make it essential to maintain good buoyancy. This is a site where touching anything is strongly discouraged.
Peering carefully into the tyre, I notice a family of Durban dancing shrimp, a species commonly found at Boonsung. Durban dancing shrimp are small, translucent crustaceans known for their rhythmic movements. They often sway and “dance” within crevices, possibly mimicking debris or detritus to avoid predators. At Boonsung, they are frequently found inside tyres, pipes, and metal cavities. They are one of the known cleaner shrimp that will even give divers a manicure!
Inside Boonsung Wreck
We follow our guide over the structure and descend deeper toward the centre of the site. At the base of the wreck, I shine my torch into a large enclosed section. A dense school of snapper, batfish, and porcupinefish fills the space.
As the beam cuts through the school, silhouettes slowly begin to appear behind them. Over the years, divers have reported finding motorbikes, vehicles, and industrial equipment within this central area. These remnants were once clearly visible, offering a glimpse into the wreck’s working past.
Today, however, the structure is far too unstable to enter safely. Even bubbles or gentle fin movements could dislodge metal and cause collapse. Combined with poor visibility, this makes penetration extremely risky. Boonsung is a wreck best explored from the outside, where its true character still shines.
Nudibranch Hotel
Continuing on the right shoulder along the sandy bottom, we reach another major section of the wreck. Here, over half of the structure still stands upright, although the interior has almost completely collapsed. I search slowly and carefully, ensuring I never pass beneath overhanging metal.
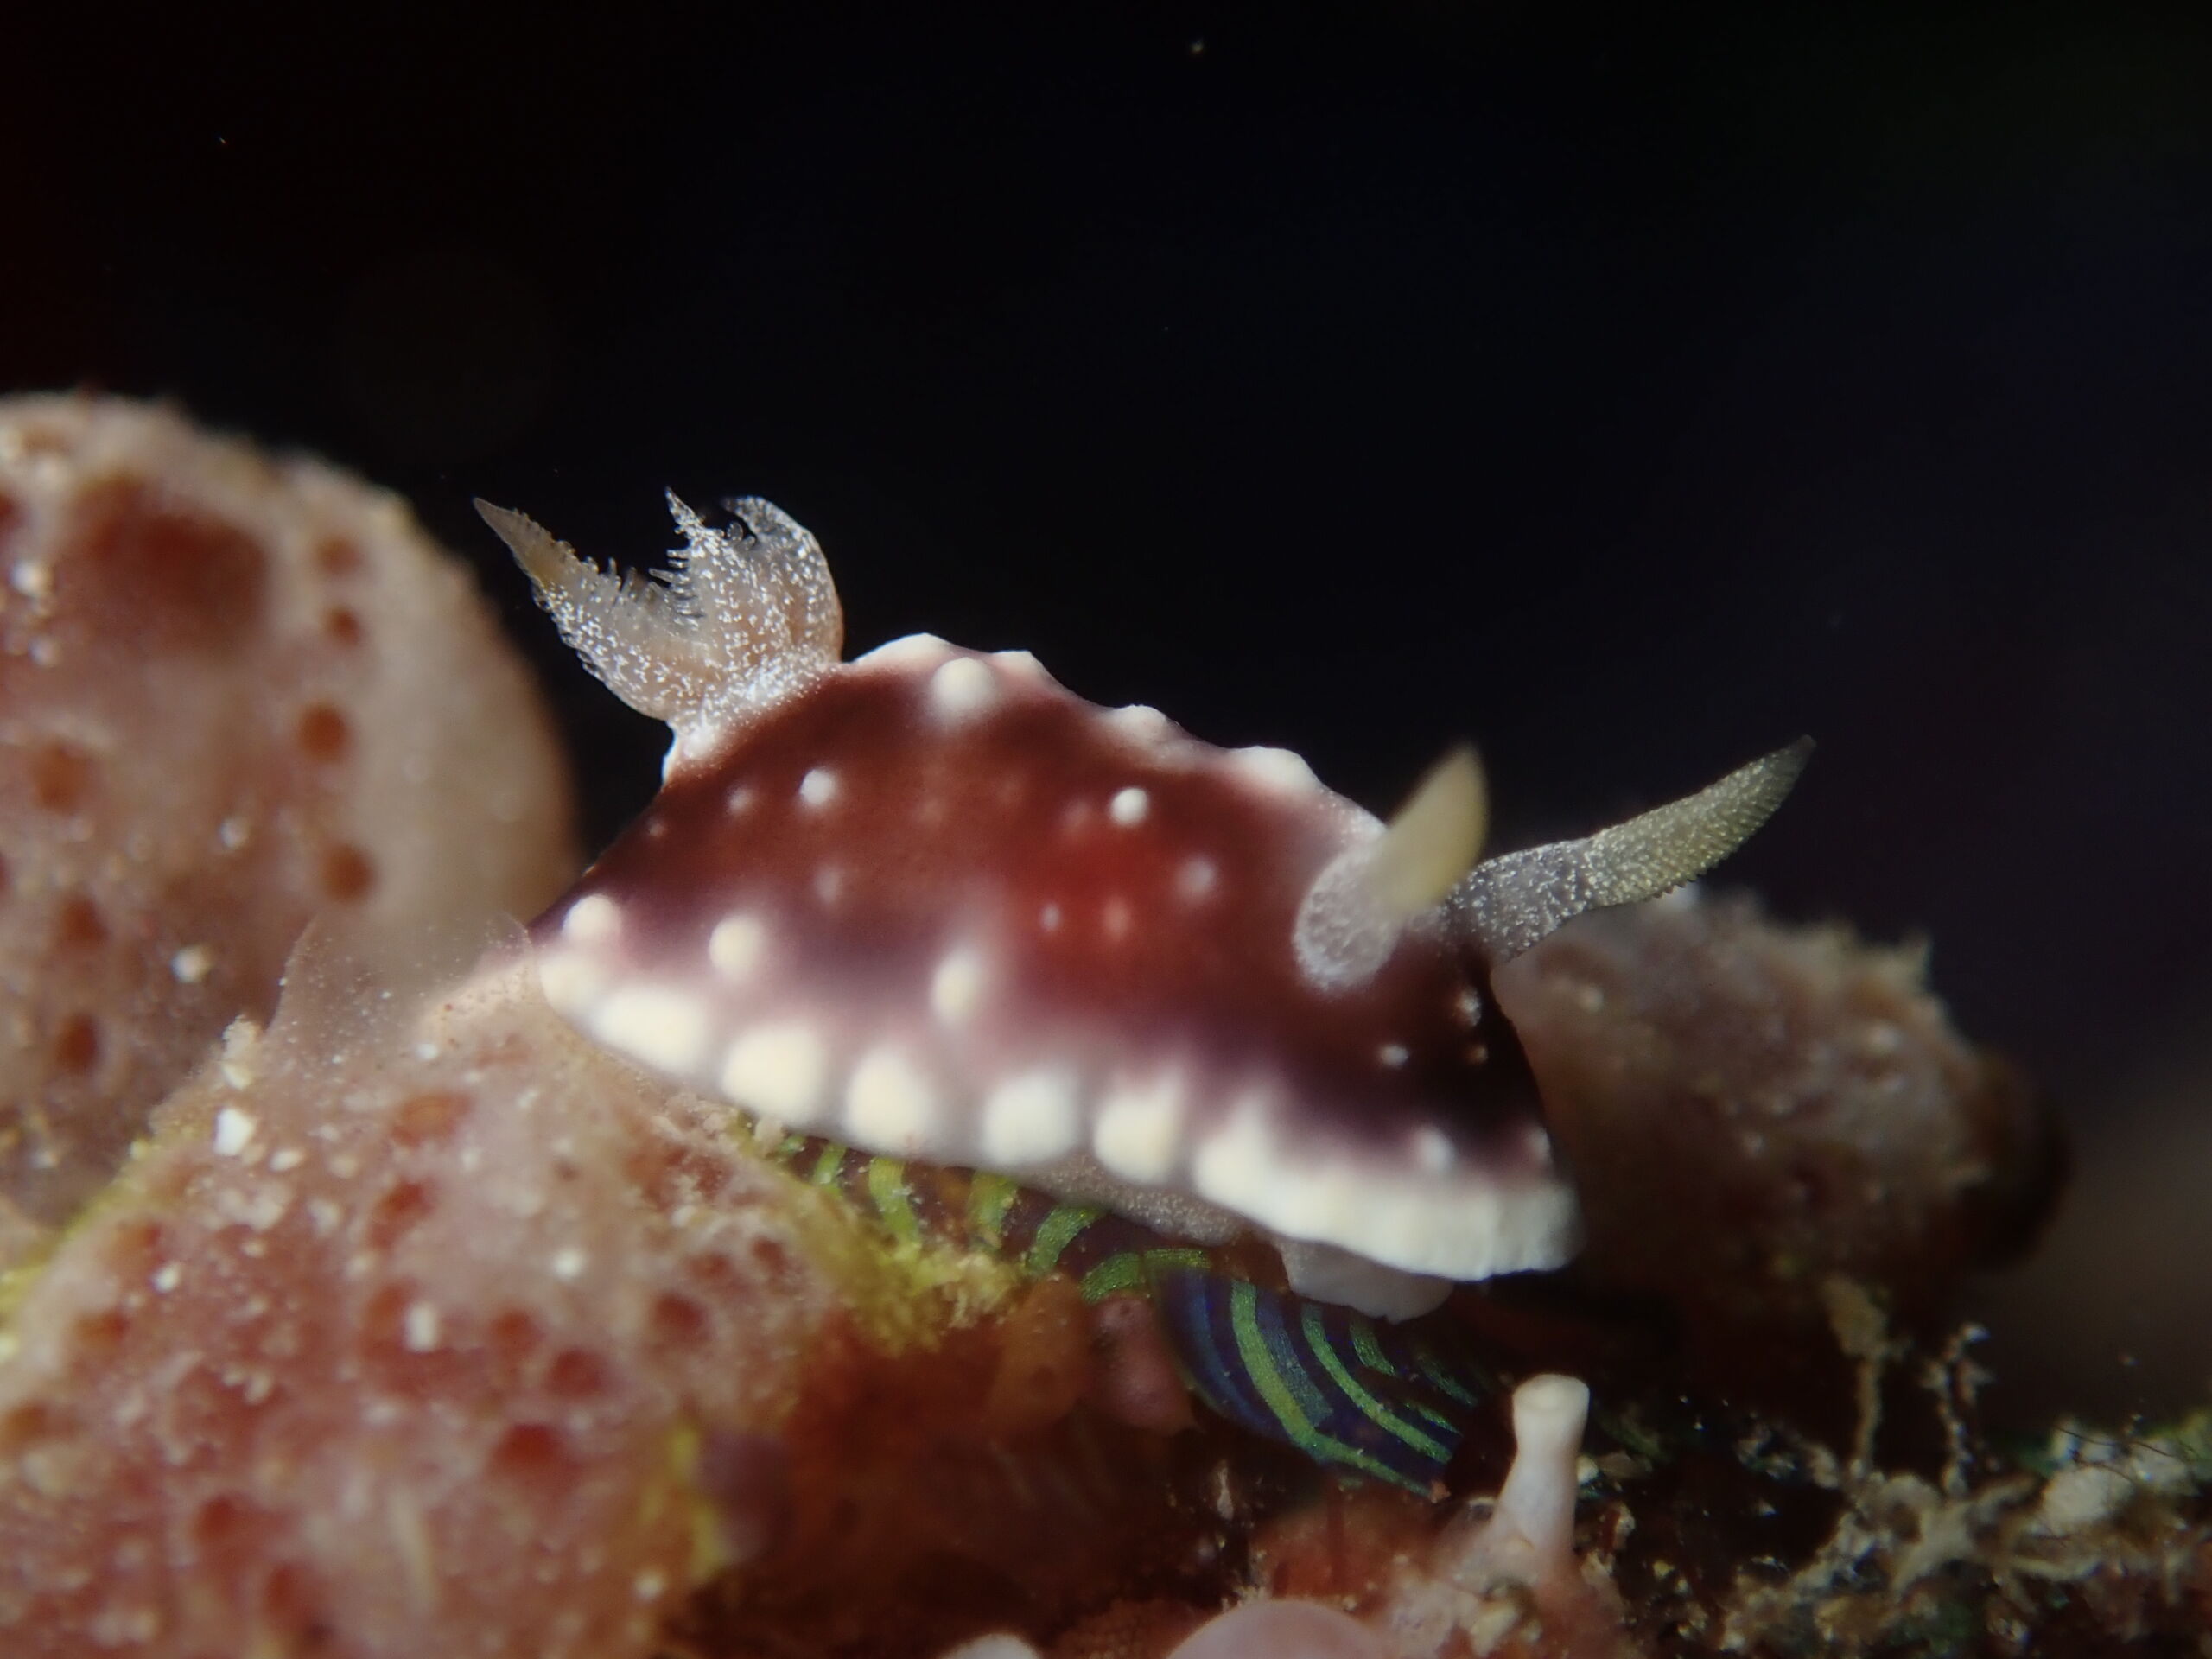
This area is famous for one very special reason. Macro life thrives here, especially an incredible variety of nudibranchs. These colourful sea slugs feed on sponges, hydroids, and algae growing across the wreck. Their bright colours often serve as warning signals, advertising their toxicity to predators. This section earned the nickname “Nudibranch Hotel”, though they can be found throughout the site. Despite their abundance, they can be difficult to spot due to their small size and camouflage.
Puffers and Porcupines
Hovering above this section of the wreck, the water is alive with movement as clouds of fish swirl constantly overhead. Within this activity, porcupinefish and pufferfish are everywhere, drifting slowly through the schools and appearing completely at ease.
Porcupinefish are instantly recognisable by their long, rigid spines. They lay flat against its body when relaxed, but the ridges are still noticeable up close. In contrast, they stand upright when the fish inflates in response to stress or danger. This defence makes them extremely difficult for predators to swallow, yet despite their armoured appearance, they are calm, slow-moving, and surprisingly curious around divers.
Pufferfish lack the long external spines of their porcupinefish relatives, relying instead on their ability to inflate and the presence of powerful toxins for protection. Many species found here, including masked pufferfish, display bold facial markings and contrasting patterns. These colourations act as warning signals to predators. Both porcupinefish and pufferfish are intelligent and inquisitive, often approaching divers closely and hovering in place as if deliberately posing for photographs.
Searching the Sand
Continuing our circuit, we move across open sand scattered with smaller debris. Broken metal fragments and rubble patches create microhabitats for elusive critters. Moving slowly, I scan the seabed carefully.
Scattered across the sand and throughout the wreck, well-camouflaged ambush predators are common. Scorpionfish, lionfish, and even stonefish can be found resting motionless on the seabed or perched on the metal structure. Their patterns blend perfectly with sand, rust, and algae, making them easy to miss at first glance. Slow movement, good trim, and no contact with the wreck is essential here, as all three species carry venomous spines and accidental contact can cause serious injury.
One of the highlights is the spearing mantis shrimp. Unlike their smashing relatives, these mantis shrimp use sharp appendages to impale prey. They live in burrows beneath the sand, often revealing themselves only by cautious eye stalks. Spotting one peeking from its hole is always a special moment. The sand is also home to flounders, stingrays, devil scorpionfish, reef-top pipefish, and even seahorses.
Unique Moray Eels
As the sand gives way to another wall of metal, I spot several cracks worth investigating. Inside one crevice, a family of five white-eyed moray eels shares a single hiding spot. White-eyed morays are smaller, slender eels with pale eyes and spotted bodies. They are often seen clustered together, especially at Boonsung. The wreck provides ideal shelter, and sightings are extremely common.
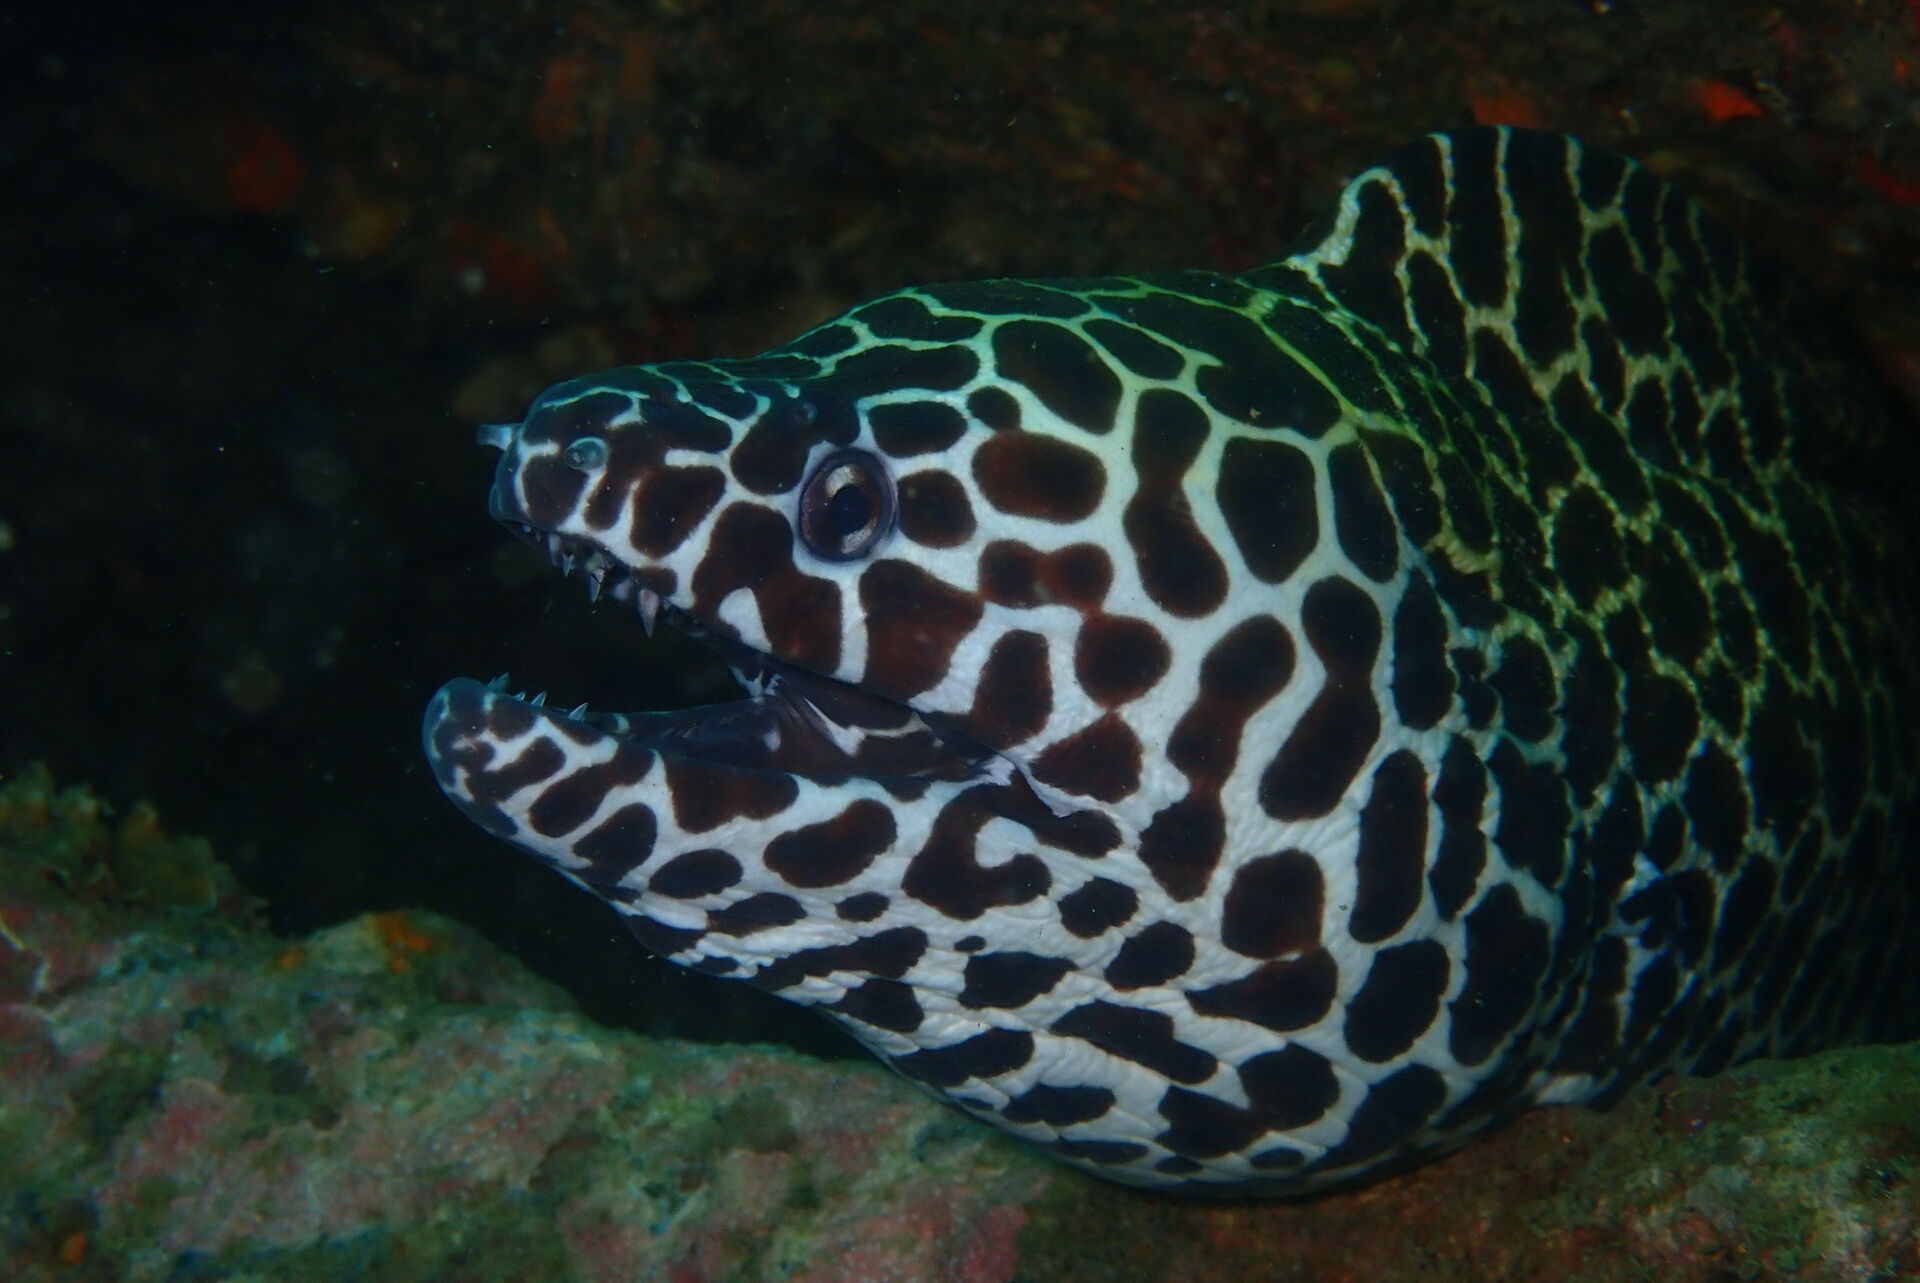
Larger giant moray eels are also frequently found here. But one eel steals the show. Tucked into the rubble ahead lies a honeycomb moray eel, its pattern immediately drawing the eye.
The honeycomb moray eel is unmistakable. It’s covered in bold, geometric markings that resemble a network of dark hexagons laid over a pale white-ish yellow body. This striking pattern is not just beautiful but practical. It helps the eel break up its outline as it hides among twisted beams and debris. They are found throughout Thailand, including the Similan Islands, yet Boonsung Wreck is one of the most reliable places to see them. Elsewhere they are often rare and fleeting encounters. But here, sightings are frequent and one of the highlights of the dive.
Above the Wreck
Even though Boonsung Wreck sits relatively shallow, our bottom time is already running out. It’s easy to lose track of time at Boonsung, with so much life unfolding around the structure. We begin to drift shallower, moving between sixteen and fourteen metres, knowing these will be our final moments above the wreck.
Hovering above this upper section, the water is thick with movement as clouds of fish surge in every direction. The wreck has become a living reef, drawing life from across the surrounding sand as one of the only structures for miles. Schools of fusiliers, snappers, and batfish weave through the beams. Trevallies, African pompanos and small barracuda circle constantly around the structure, darting through the schools and keeping them compressed. At times, the sheer volume of fish makes the wreck itself hard to see beneath the swirling activity.
This part of the wreck also reveals its hazards more clearly, with discarded fishing line and hooks scattered across the metal. We stay aware of our surroundings and maintain careful buoyancy, taking in the view while keeping a safe distance. Fish continue to dance around us through rays of sunlight as we prepare to leave the wreck behind and begin our ascent.
Back to the Surface
With the wreck now below us, we begin our ascent slowly and deliberately. The top of Boonsung sits at around 14 metres. This means we need to leave early to allow for a safe, unhurried ascent to our safety stop. As our guide deploys the SMB early, we drift away from the wreck, watching its shape soften and fade beneath us.
Eventually, the sound of the engine returns, and the dinghy approaches, tracking our drifting SMB. We surface calmly and climb aboard, marking the end of our final dive of the trip. It feels like a quiet farewell to a site that never fails to surprise.
Like what you read? share it with your friends!
Final Thoughts
From coral reefs to remote islands, pinnacles, and wrecks, this journey showed the diversity of the Andaman Sea. Each dive offered something different, slowly building toward this final chapter at Boonsung Wreck. Here, marine life has reclaimed an industrial past and turned it into a thriving underwater habitat.
If this story sparked your curiosity, explore the rest of our Dive With Us series and follow the journey from the beginning. Or join us onboard MV DiveRACE Class X and experience these dives for yourself!
Book your next liveaboard trip here.
Want to read more? Take a look at our latest posts!
- DiveRACE Safety Series: Diving Practices & Underwater Awareness
- Purpose-Built Workboats: The Support Heroes of MV DiveRACE Class X
- Symbiosis in The Similan Islands: 10 Intriguing and Disturbing Examples
- Acropora Corals in Thailand: The Science Behind Our Restoration Work
- Dive With Us in The Similan Islands: #12 Boonsung Wreck
Related Articles
-

Mergui Archipelago with DiveRACE
The Mergui Archipelago, located in southern Myanmar, is one of Southeast Asia’s…
-

Eat. Sleep. Dive. INFLATABLE FUN!
Diving isn’t the only way to enjoy the waters around Thailand. On…
-

Giant Trevallies at Koh Tachai Pinnacle
Koh Tachai Pinnacle is a top dive site in Thailand, famous for…
